How to do: bathtub caulking
How to Do Bathtub Caulking: A Quick and Easy DIY Guide
Key Takeaways
- You do not need expensive caulking sealant — an inexpensive kitchen-and-bath silicone caulk works fine since you can redo it quickly once you learn the technique
- The entire job takes less than 10 minutes: strip old caulking, apply new caulking, smooth with your finger
- A caulking gun costs about $5 at Home Depot and is reusable for many projects
- Wait at least 24 hours before using the shower or bath after applying new caulk
- Re-caulking regularly (every 6 to 12 months) is a better strategy than buying premium anti-mold caulk and hoping it lasts forever
Why Bathtub Caulking Needs Regular Replacement
Take a look at the caulking around your bathtub right now. If your bathroom is more than a year old, there is a good chance you will see black or dark mold growing along the caulk lines where the tub meets the wall or the tub meets the floor.
This happens because bathroom caulking sits in the worst possible environment: constant moisture, warm temperatures, and soap residue. These conditions are paradise for mold and mildew. Even premium anti-microbial caulk eventually succumbs to mold growth. The only question is how long it takes.
The good news is that replacing bathtub caulking is one of the simplest, fastest, and most satisfying home maintenance tasks you can do. Once you learn the technique, you can redo your entire bathtub caulking in under 10 minutes. And when you can do it that quickly, the smartest strategy is to redo it every 6 to 12 months with inexpensive caulk rather than paying premium prices for “mold-resistant” formulations and hoping for the best.
What You Need
Essential Supplies
- Caulking gun — A basic caulking gun from Home Depot costs about $5 and will last you for years. It holds standard-sized caulk tubes and has a trigger mechanism for controlled dispensing plus a release lever to stop the flow
- Kitchen and bath silicone caulk — Get a tube labeled for kitchen and bath use. These are silicone-based or silicone-blend formulations designed for wet environments. A single tube costs $3 to $8 and will do an entire bathtub with caulk left over
- Razor blade or utility knife — For removing old caulk and cutting the tip of the new tube
- Screwdriver — Helpful for scraping stubborn old caulk out of corners
Optional but Helpful
- Painter’s tape — Apply along both sides of the caulk line for a perfectly straight bead (remove before caulk dries)
- Rubbing alcohol or caulk remover — For cleaning residue from the old caulk
- Disposable gloves — If you do not want caulk on your hands (though using a bare finger gives the best smoothing results)
Choosing the Right Caulk
When you walk into the caulking aisle at the hardware store, you will see dozens of options. Here is how to narrow it down:
- Must be silicone-based — For bathroom use, silicone or silicone-blend caulk is essential. Pure latex caulk does not hold up to constant water exposure
- Must say “Kitchen and Bath” — These formulations include fungicides and are designed for wet environments
- Skip the expensive brands — As I mentioned, the key to mold-free caulk lines is frequent replacement, not expensive caulk. A $4 tube replaced every 6 months will look better than a $12 tube left in place for 3 years
Step-by-Step: How to Re-Caulk Your Bathtub
Step 1: Remove the Old Caulking
This is the most important step. New caulk will not adhere properly over old caulk, so you need to strip all of the old material out.
Use a razor blade or utility knife to cut along both edges of the old caulk bead. Once you have cut both sides, the old caulk should peel away in strips. For stubborn sections, use a flathead screwdriver to pry and scrape the old caulk out of the joint.
The goal is a clean, bare joint with no old caulk residue remaining. In the video, I demonstrate how easily the old caulk strips away — it literally peels off in pieces once you get an edge started.
Step 2: Clean the Surface
After removing the old caulk, wipe the joint area with rubbing alcohol or a damp cloth to remove any remaining residue, soap scum, or mold. Let the surface dry completely before applying new caulk. Applying caulk to a wet surface will prevent proper adhesion.
Step 3: Load and Prepare the Caulking Gun
Insert the caulk tube into the caulking gun. Cut the tip of the tube at a 45-degree angle using a utility knife. The size of the opening determines the width of your caulk bead — for bathtub caulking, a moderate opening (about 1/4 inch) works well. You can always cut more off if you need a wider bead, but you cannot make it smaller once cut.
Some caulk tubes have an inner foil seal that you need to puncture. Most caulking guns have a thin wire poker built into the handle for this purpose.
Step 4: Apply the Caulk
Hold the caulking gun at a 45-degree angle to the joint. Squeeze the trigger and move the gun along the joint at a steady, consistent speed. The key is maintaining even pressure and speed so the bead of caulk is uniform in thickness.
A few tips for a smooth application:
- Press the tip firmly against the joint — This forces the caulk into the gap rather than just laying on top
- Move at a consistent speed — Too fast and you get gaps; too slow and you get excess buildup
- Use the release lever — When you need to stop (to reposition or move to a different section), press the release lever on the back of the gun to stop caulk from continuing to ooze out
- Work in straight sections — Do one straight run at a time rather than trying to go around corners in one continuous motion
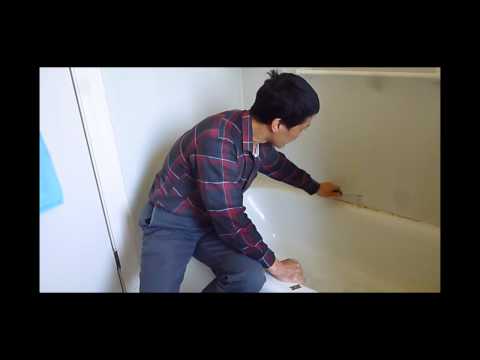
Step 5: Smooth the Caulk With Your Finger
This is where the magic happens. Wet your index finger slightly (just a touch of water) and run it along the bead of caulk you just applied. Press firmly enough to push the caulk into the joint and create a smooth, concave surface.
One pass should do it. Do not go back and forth repeatedly — this creates a messy, uneven finish. One firm, steady swipe with your finger is all you need.
If you are uncomfortable using your bare finger, you can use a caulk finishing tool or even the back of a plastic spoon. But honestly, your finger gives you the best control and feel. Just wash your hands thoroughly afterward.
Step 6: Clean Up Excess
If there is excess caulk squeezed out to the sides, wipe it up immediately with a damp paper towel or cloth. Fresh caulk cleans up easily with water. Once it cures, it becomes much harder to remove.
If you used painter’s tape, peel it off now — before the caulk starts to set. Pulling tape off after the caulk has partially cured will create a ragged edge.
Drying and Curing Time
- Touch dry: 30 minutes to 2 hours depending on humidity and temperature
- Water resistant: 4 to 6 hours (do not splash water on it before this)
- Fully cured: 24 hours (wait this long before showering or bathing)
Silicone caulk cures through a chemical reaction with moisture in the air, so higher humidity actually speeds up the curing process. Do not try to speed it up with a hair dryer — heat can cause the surface to skin over while the interior remains uncured.
How Often Should You Re-Caulk?
This depends on your bathroom usage and ventilation:
- Bathrooms with good ventilation (exhaust fan, window): Re-caulk every 12 to 18 months
- Bathrooms with poor ventilation: Re-caulk every 6 to 9 months
- High-use bathrooms (multiple daily showers): Re-caulk every 6 months
The moment you see black mold starting to grow on the caulk, it is time to redo it. Do not wait for it to get worse — the longer mold grows, the harder it is to clean the surface underneath before re-caulking.
Common Mistakes to Avoid
- Applying new caulk over old caulk — This never works. The new caulk will peel away from the old caulk within weeks
- Not letting the surface dry — Caulk needs a dry surface to adhere properly
- Cutting too large an opening — Start with a small opening and enlarge it if needed
- Working too slowly — The caulk starts to set within 15 to 30 minutes. Apply and smooth it before it begins curing
More DIY Home Improvement Projects
If you found this bathtub caulking guide helpful, you might also enjoy these related projects:
- How to replace galvanized pipe with copper pipe — A more advanced plumbing project for when simple fixes are not enough
- How to install hardwood flooring — Another hands-on home improvement project that saves thousands in labor costs
- Rearview mirror repair — If you enjoy fixing things around the house, car repairs are a natural next step
Sources
- How to Caulk a Bathtub — This Old House — accessed March 26, 2026
- Bathroom Caulking Guide — Home Depot — accessed March 26, 2026